
SELLER CHECKLIST
NEW JERSEY
The Complete Home Staging Checklist for New Jersey Sellers
Preparing a home can feel like everything needs attention at once. This checklist organizes the process—what to do first, room by room, and in the final days before photography.
StageIT Staging Team
.
August 2026
.
11 min read
KEY TAKEAWAYS
The short version
- Work in order: declutter and repair first, then room by room, then photography prep.
- Decluttering and cleaning usually matter more than adding new décor.
- Start 30–60 days before listing so you can prepare in stages, not one weekend.
- Cleaning can't fix vacant rooms, awkward layouts, or poorly scaled furniture—that's where staging helps.
Preparing a home for sale can feel like everything needs attention at once. A home staging checklist helps organize the process—what to do first, what to handle room by room, and what to save for the final days before photography. You don’t need to complete everything in one weekend. Starting early and working in stages makes the process more manageable.
How to Use This Checklist
Work in order: start with general preparation, move room by room, then finish with photography prep. Vacant and occupied homes need different approaches—vacant properties usually require more attention to furniture, scale, and room function. For a detailed comparison, see the vacant vs. occupied home staging guide. Before buying décor or rearranging furniture, finish decluttering and basic repairs first; that often makes it clearer what actually needs to change.
WEEKS 5–6
01
Declutter, repair & clean
WEEKS 3–4
02
Arrange rooms & define function
WEEKS 1–2
03
Deep clean, style & prep for photos
FINAL DAYS
04
Walkthrough & last-minute reset
Declutter and Repair First
Start with the basics. Decluttering, minor repairs, and deep cleaning usually have more impact than adding new décor.
Declutter & simplify
- Remove excess furniture that blocks walkways or crowds rooms
- Pack away some personal photos, collections, and memorabilia—without making the home feel sterile
- Clear floors, pathways, and circulation areas
- Edit closets and storage so buyers can see usable capacity
Minor repairs & cleaning
- Repair visible scuffs, nail holes, chipped trim, and damaged paint
- Replace broken or mismatched cabinet and door hardware
- Replace burnt-out bulbs and correct inconsistent lighting
- Deep clean baseboards, grout, vents, ceiling fans, and behind appliances
- Check each room to see whether repainting is actually necessary
Should you repaint? Consider it when colors are highly distracting, walls are visibly worn, or touch-ups will photograph poorly. You don’t need to repaint every room simply to make it neutral. If unsure, ask a stager before committing to a full repaint.
Not a staging matter
Structural, roofing, electrical, plumbing, mold, safety, and disclosure issues are not staging matters and should be handled by the appropriate licensed professionals. Staging focuses on presentation, not required repairs or disclosures.
Entryway and Curb Appeal
The exterior approach and entryway shape a buyer’s first impression, so keep both clean, simple, and well maintained.
Exterior & interior entry
- Clear the porch, steps, and driveway of unnecessary items
- Remove dead or excessive seasonal décor; sweep leaves, dirt, or salt
- Check exterior lights; make house numbers clearly visible
- Clean the front door, glass, and sidelights; use a clean, right-sized doormat
- Remove excess shoes, coats, and bags; confirm entry lighting is bright
New Jersey weather can quickly affect curb appeal. Before photography, clear seasonal debris, winter salt, pollen, or coastal salt residue from visible surfaces and windows. For larger exterior repairs such as siding, fencing, or walkways, use the appropriate contractor rather than treating them as staging tasks.
Living Room
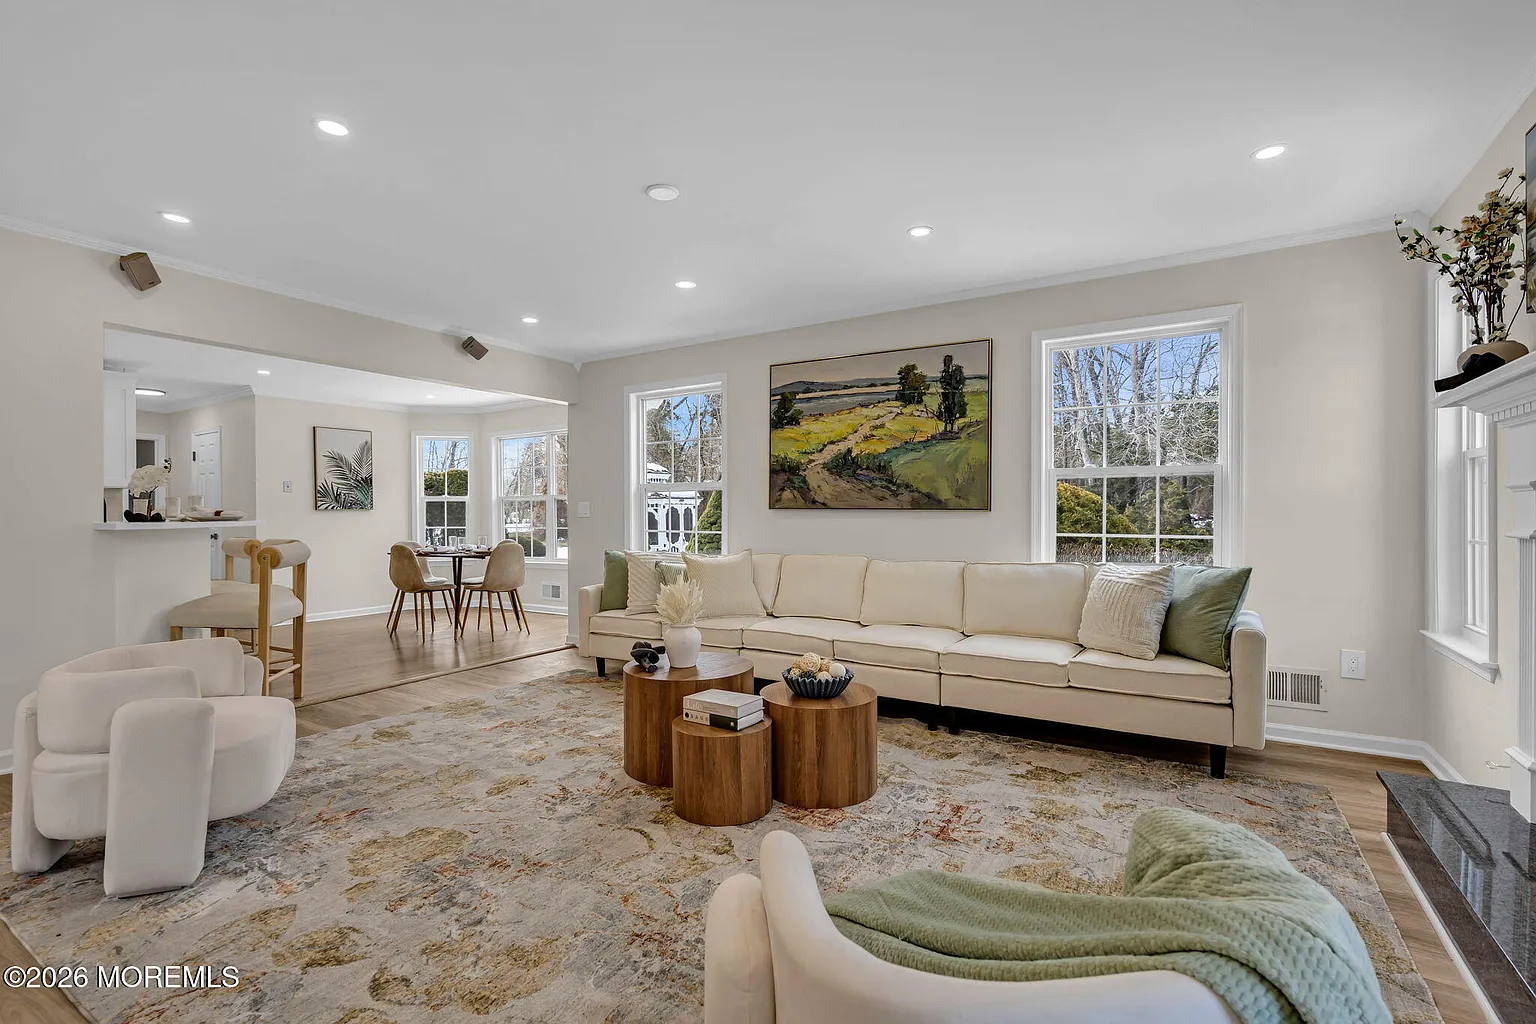
Living room checklist
- Remove excess seating or oversized pieces; keep walkways clear
- Arrange seating toward a logical focal point—fireplace, window, or feature wall
- Keep windows clear to maximize natural light
- Hide cords, cables, and remote controls; limit accessories
- Check the area rug is appropriately sized
- Make sure furniture doesn't block doors, built-ins, or architectural features
More furniture is not always better. If the room is vacant, awkwardly shaped, or filled with poorly scaled furniture, professional staging may help buyers understand the room’s scale and function more clearly.
Kitchen
Kitchen checklist
- Clear most countertop items, leaving only a few intentional pieces
- Remove magnets, papers, and menus from appliance fronts
- Clean appliance surfaces, especially stainless steel; clear the sink area
- Simplify open shelving; remove clutter from above cabinets
- Check lighting; clean backsplash and grout
- Remove trash bins, pet bowls, and cleaning supplies before photography
Aim for balance: too many items create clutter, while completely bare counters can feel cold. A few well-placed accessories usually work best.
Dining Room
Dining room checklist
- Remove extra chairs or furniture that restricts circulation
- Center the table within the usable dining area
- Keep the tabletop simple—one low centerpiece or a few restrained pieces
- Center lighting over the table where possible
- In open layouts, use furniture placement to separate dining and living zones
If the dining area is vacant or difficult to define, appropriately scaled furniture can help make its intended function clearer in listing photos.
Primary Bedroom and Bathrooms
Primary bedroom
- Position the bed on a logical focal wall; keep bedding simple and coordinated
- Limit nightstand items to one or two pieces; remove excess furniture
- Clear exercise equipment, laundry, and work materials
- Organize the closet to show usable storage; make the most of natural light
Bathrooms
- Clear counters of toiletries, medications, and clutter
- Use clean, coordinated towels; remove bath mats if they shrink the room
- Clean mirrors, glass, and fixtures; close the toilet lid for photos
- Remove trash, laundry, and grooming tools; keep accessories minimal
Secondary Bedrooms and Home Office
Each room should have one clear purpose. Spaces that combine an office, gym, guest room, and storage can feel confusing in listing photos.
Choose one primary function for each room; remove excess or mismatched furniture
Keep children's rooms organized without removing all personality
Make home offices read as workspaces—desk, chair, adequate lighting; hide cables
Keep as much floor space open as possible
If a spare room has become a catch-all or moving-storage area, simplify it before listing. When it still lacks a clear purpose, selective furniture staging may communicate its function better than leaving miscellaneous belongings in place.
The Week of Listing Photography
The final week is about presentation, not major projects. Focus on making sure the home looks as good in photos as it does in person.
48–72 hours before
- Deep clean floors, surfaces, mirrors, and glass; finish and remove laundry
- Check all bulbs work and lighting is reasonably consistent
- Remove boxes, tools, and moving supplies from photographed areas
- Finish exterior cleanup; leave staged furniture in final positions
Photo day
- Open blinds and turn on lights as the photographer directs
- Clear kitchen and bathroom counters; move bins out of view
- Remove pet beds, bowls, litter boxes, and food storage
- Hide cleaning supplies, dish racks, and drying towels
- Make all beds and close toilet lids; move cars if requested
Before the photographer arrives, take a quick phone photo from the doorway of each main room. Small distractions are often easier to spot in a photo than in person.
Cleaning and decluttering are essential—but they cannot solve every presentation problem.
STAGING PRINCIPLE · WHAT DIY CAN'T FIX
What This Checklist Cannot Fix
If the home is clean, decluttered, and prepared but key rooms still feel empty, awkward, or difficult to understand in photos, the issue may be furniture scale or space planning rather than more DIY work.
| Usually reasonable DIY | May need professional input | Not a staging task |
|---|---|---|
| Decluttering and routine cleaning | Vacant living rooms or primary bedrooms | Structural, electrical, plumbing, or safety repairs |
| Removing excess personal items | Poorly scaled furniture | Mold, water intrusion, pests, or hazardous materials |
| Minor paint touch-ups | Awkward layouts or unclear room function | Major renovation work |
| Photo-day reset and temporary clutter removal | Cohesive multi-room presentation | Attempting to conceal material defects |
Physical staging uses real furniture in the property before photography and showings. Virtual staging changes the listing images only. If your key rooms still feel empty or unclear after completing the checklist, StageIT US can provide a room-by-room recommendation and property-specific estimate.
Start Early and Follow the Sequence
A staging checklist works best when you start early and follow the steps in order. By the final days, the home should feel clean, organized, and easy to understand in a quick walkthrough. If key rooms still feel empty, awkward, or unclear after the DIY work is complete, that may be the right time to request professional staging advice.
IN THIS ARTICLE
Rooms still feel off?
If key rooms feel empty or awkward after the checklist, get a room-by-room recommendation.
or call 732-475-3439
SHARE
FREE STAGING ESTIMATE
When DIY prep isn't quite enough
If key rooms still feel empty or unclear, share the property address, occupancy status, priority rooms, access details, and photography date for a property-specific recommendation.
Staging Prep: Common Questions
Answers for New Jersey sellers working through the checklist.
What should I do first when staging my home?
Start with decluttering, cleaning, and obvious repairs before buying décor or rearranging furniture. Once visual clutter is reduced, it becomes much easier to see what each room actually needs.
How far in advance should I start staging?
Starting 30–60 days before listing gives most sellers enough time to prepare without rushing. The exact timeline depends on the home’s condition, repairs, moving schedule, and photography date.
Can I stage my home myself?
Yes, many tasks can be DIY—decluttering, cleaning, simplifying rooms, and preparing for photography. Professional staging may be more useful for vacant rooms, awkward layouts, poorly scaled furniture, or homes that need a cohesive multi-room presentation.
Which rooms matter most to buyers?
For staging and listing photography, the main living area, primary bedroom, kitchen, and dining space usually deserve the most attention. Secondary bedrooms and bathrooms can also matter depending on the property, layout, and how they appear in photos.
Do I need to repaint before staging?
Not always. Repaint when the color or wall condition is distracting, visibly worn, or likely to photograph poorly. If the existing paint presents well, a full repaint may not be necessary.
Related Transformations
See what a fully prepared, staged NJ home looks like.

Home Staging Colts Neck NJ — 4BR Renovated Ranch
Home Staging Colts Neck NJ — 4BR Renovated Ranch Sold for $1,300,000 Project Overview StageIt US completed this home staging
Home Staging Toms River NJ — 7BR Green Island Coastal Retreat
Home Staging Toms River NJ — 7BR Green Island Coastal Retreat Sold for $608,000 Project Overview StageIt US completed this

Home Staging West Milford NJ — 2BR 1986 Townhouse
Home Staging West Milford NJ — 2BR 1986 Townhouse Sold for $420,000 Project Overview 2-bed, 2.5-bath, 1,466 sqft 1986-built traditional
Request a property-specific estimate
Share the property address, occupancy status, priority rooms, access details, and target photography date. Real estate agents can also contact StageIT US about upcoming client listings.